

How Do I Erase Background In Paint
A fundamental step in many photo editing projects, such as creating composite images, is to remove the background and so that you tin can replace it with a different groundwork or excerpt a field of study or object to utilise in another prototype. In this tutorial you lot'll acquire how to practise photograph groundwork removal using the Smart Choice Mask tool, which is new to PHOTO-PAINT 2020, and the Cutout Lab.
Thanks for watching! We hope you found this tutorial helpful and we would love to hear your feedback in the Comments section at the bottom of the page. You volition find a written version of this tutorial below, and a printable PDF copy to download on the Download Resource tab above.
A key step in many photograph editing projects, such as creating composite images, is to remove the background so that you tin can replace it with a unlike background or extract a subject or object to use in another image. In this tutorial you'll larn how to do photo groundwork removal using the Smart Selection Mask tool, which is new to PHOTO-Pigment 2020, and the Cutout Lab.
Thanks for watching! We hope you found this tutorial helpful and we would love to hear your feedback in the Comments section at the lesser of the page. Y'all will discover a written version of this tutorial below, and a printable PDF copy to download on the Download Resources tab above.
See what's new in CorelDRAW Graphics Suite!
Download your FREE 15-day trial for Windows or Mac and fuel your artistic burn with the new perspective tools, flexible design space, progressive photograph editing tools, and much more.
Download these free resources:
Written tutorial for Windows (PDF, 1.4 MB)
Written tutorial for Mac (PDF, one.iv MB)
CorelDRAW Graphics Suite Resources
Quick Get-go Guide (PDF, two MB)
Keyboard Shortcuts (PDF, 3.5 MB)
CorelDRAW User Guide (PDF, 28 MB)
PHOTO-Paint User Guide (PDF, 26 MB)
Introduction to PHOTO-Paint
What's New in CorelDRAW Graphics Suite
Photograph Background Removal in PHOTO-Paint
This tutorial will demonstrate two methods for removing the background of a photo: theCutout Lab and theSmart Option mask tool.
Click on whatever of the images to view full-size.
Background Removal with the Cutout Lab
In our outset instance, we want to put the dog's face up on a dissimilar groundwork image, and so we need to remove everything else.

Become toImage >Cutout Lab. When using theCutout Lab, the first footstep is to trace around the area yous want to keep. TheHighlighter tool is active past default, and you can suit the settings forNib Size,Highlight Color andFill Color.
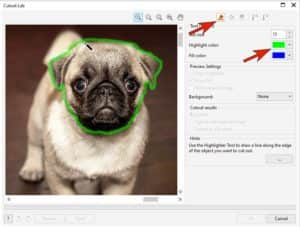
After tracing a closed loop, the next footstep is to choose which surface area to keep – inside or outside the highlighted surface area. Activate theInside Fill tool and click within the expanse you traced.
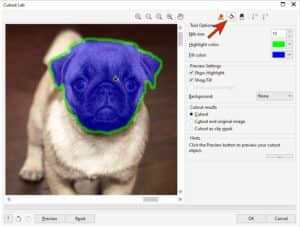
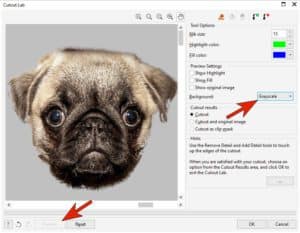
You can click thePreview button to check the results so far and zoom in to see more particular. From theGroundwork dropdown list, you can choose to add aGrayscale,Black matte orWhite matte background, which can make it easier to run across the cutout results.
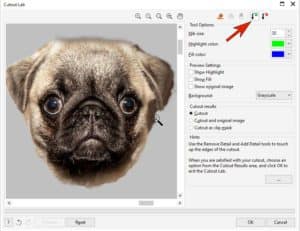
In one case you accept clicked on thePreview push button, theAdd Detail andRemove Detail tools become bachelor at the summit of the window. You can adjust thePecker Size of the tool and use it to refine your cutout to add together or remove any $.25.
TIP: If yous take theAdd Detail tool activated, using your right mouse button will switch to theRemove Detail tool, and vice versa. This is a quicker fashion to switch between adding and removing detail from your cutout.
Once you have finalized your cutout, you tin can choose theCutout results:
- Cutout creates an object from your cutout and discards the original epitome.
- Cutout and original paradigm creates an object from your cutout and preserves the original image.
- Cutout every bit prune mask creates a clip mask from the cutout. The clip mask is attached to the original image and tin can viewed in theObjectsdocker.

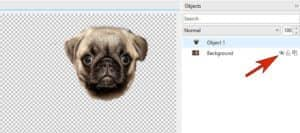
After you take selected theCutout results option y'all want, clickOK. In this example we choseCutout and original epitome, so now in theObjects docker in that location are ii objects:Object 1 which is the cutout, andGroundwork which is the original photograph. Click theEye icon to hide the background.
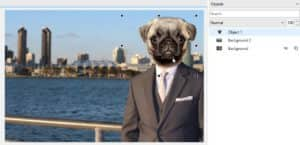
To add together a new background, utiliseFile >Import to bring in the background epitome. In theObjects docker, elevate the imported photo (calledBackground 2) below theObject 1 cutout layer. Apply theOption tool to resize and reposition the new background image and cutout every bit needed.
Background Removal with Masking
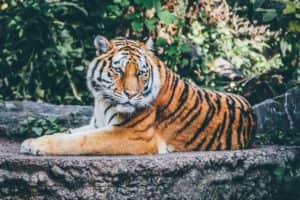
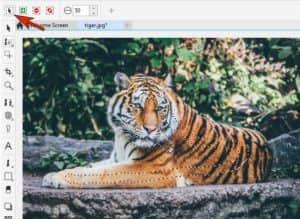
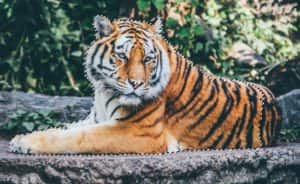
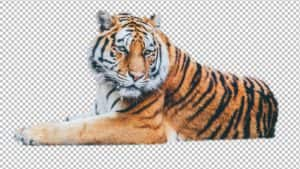
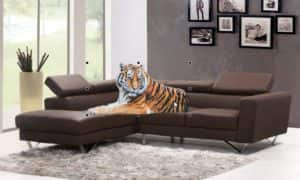
For the second example, we want to cut out the tiger in this photograph and identify information technology on a new background.
When you open an image in Photo-Pigment it will be a background layer and some editing tools can't exist practical to backgrounds. So in theObjects docker, click theCreate Object from Background icon to make the background into an object.

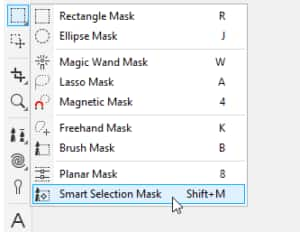
There are a number of different mask tools only for this example nosotros are using theSmart Selection Mask, which is new in PHOTO-PAINT 2020.
Once yous activate theSmart Selection Mask tool, at that place will be some options available on the interactiveProperty Bar along the top.
Click on theNormal style push and adjust theNib sizeif desired. To define the initial area, click and drag your mouse within the tiger . . .
. . . and when you lot release your mouse button, the mask expanse will expand to select just about the unabridged tiger.
To add together any bits that weren't included, switch toAdditive fashion on theHolding Bar, or agree down theShift key while clicking or dragging with your mouse. If you accidentally select any parts of the background, switch toSubtractive mode or hold down theCtrl key while clicking and dragging to remove them.
TIP: hold down theAlt key while dragging with your mouse key to resize the nib equally you are working.

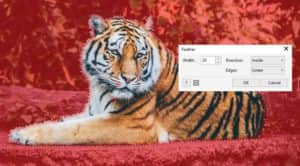
Once your mask selection is consummate to your liking, you tin can arrange the mask border by going toMask >Mask Outline >Feather. Adding a modest amount ofWithin feather will soften the edges to help it blend better. In theFeather dialog box, click thePreview icon to see what the results will look like.
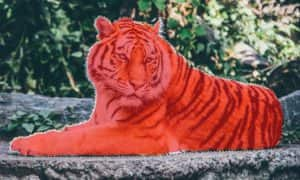
The area inside the mask is what would exist removed when you lot useCtrl +X to cutting out the image. You can see this when y'all go toMask >Mask Overlay – the cerise area is what will be kept. Since nosotros desire to remove the background, which is outside the mask area, we need to capsize the mask by going toMask >Invert Mask. Now the mask overlay shows that the tiger will exist kept, and the background will be removed when nosotros pressCtrl +X.
PressCtrl +X and the background is removed.
To identify the tiger onto a new background, you lot can import the groundwork image into the tiger paradigm as we did with the previous example. Drag the groundwork layer below the tiger layer in theObjects docker and use theChoice tool to resize and reposition every bit needed.
Another fashion is to open up your new background as a new file and employCtrl +C to copy the tiger, thenCtrl +Five to paste the tiger onto the new groundwork. Again, use thePick tool to resize and reposition as needed.
Related Tutorials
Using Masks in Corel Photograph-PAINT
Acquire how to utilize masks in Corel Photo-PAINT to selectively edit portions of your image, cut and paste epitome areas, and create composite images.
Encounter what's new in CorelDRAW Graphics Suite!
Download your FREE 15-day trial for Windows or Mac and fuel your creative fire with the new perspective tools, flexible pattern space, progressive photo editing tools, and much more.

How Do I Erase Background In Paint,
Source: https://learn.corel.com/tutorials/photo-background-removal-in-photo-paint/
Posted by: weatherlydepeonew1989.blogspot.com
0 Response to "How Do I Erase Background In Paint"
Post a Comment