

How To Add A Background To A Picture With Paint 3d
In this article
Part ane Intro of Windows 10 Paint 3D
Part 1 Intro of Windows ten Paint 3D
Windows Pigment 3D is designed past (you lot guessed it) Microsoft. It is a tool that facilitates editing & creating graphics in Windows x. We all have used Paint; Windows Paint 3D has a similar interface merely comes with advanced functionalities.
The "3D" in the application'southward name is real and information technology allows yous to render your graphics in iii dimensions. In a way, Windows Pigment 3D is a tool that is suitable for both beginners and professionals. Before we move on to how to make the background transparent in Paint 3D, let's quickly look at a few pros and cons of the tool.
Pros
The tool has a familiar user interface which makes it easier to utilize.
Information technology allows you to transform your 2d to 3D within seconds.
Paint 3D also has a huge library of templates that makes it fifty-fifty simpler for beginners.
Cons
Windows Paint 3D doesn't have some of the bones paradigm correction tools that you'd unremarkably meet in other editing software.
If y'all are a professional, Paint 3D might not be an ideal pick for you.
The 3D capture mobile app has quite a few bugs.
Function 2 How to create a transparent background in Pigment 3D?
In the above section, we saw a few pros & cons of Paint 3D. Allow'due south await at how to create a transparent groundwork in Pigment 3D. Just why is making transparent groundwork of import anyway?
Among many other things like eCommerce platform guidelines for production images, making the background transparent helps your followers & target audience to focus on the principal object in your images. Images with transparent backgrounds are visually appealing equally well.
Hither's a pace-by-step guide on how to brand groundwork transparent in Paint 3D.
Step 1:
Open up the prototype you want to edit in Paint 3D.
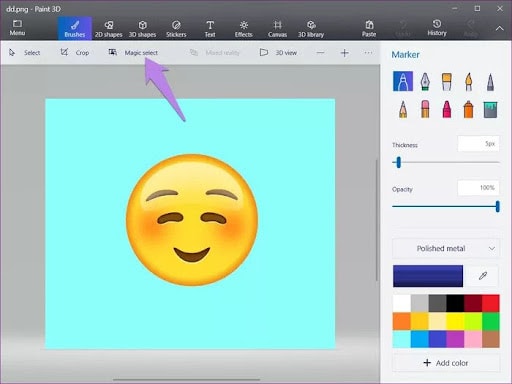
Step 2:
Click on the Magic Select tool. You'll see a choice rectangle covering the entire paradigm.
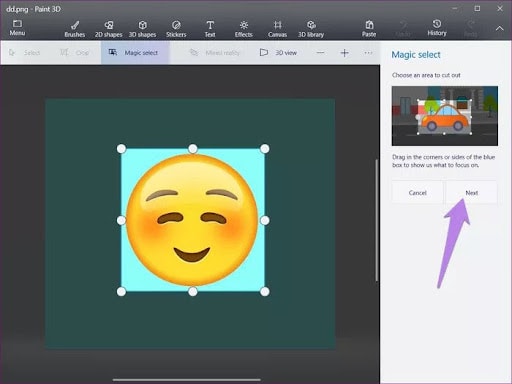
Step 3:
Minimize the option rectangle (using the sides or corners) of the Magic Select tool to comprehend the chief object of your image. You will see a nudge on the right side that shows you lot how to exercise that.
Step 4:
Once you have selected the master object of your epitome, click on the "Side by side" button on the right side of your screen. Paint 3D will automatically identify your main object and clear the area outside the selection rectangle.
Step five:
Obviously, the Magic Select tool is not 100% authentic, especially with portraits. And then, you lot might exist left with a few unwanted elements. Click on the "Remove " option from the right side of Paint 3D's screen and keep clicking on the unwanted elements that yous want to remove from your image.
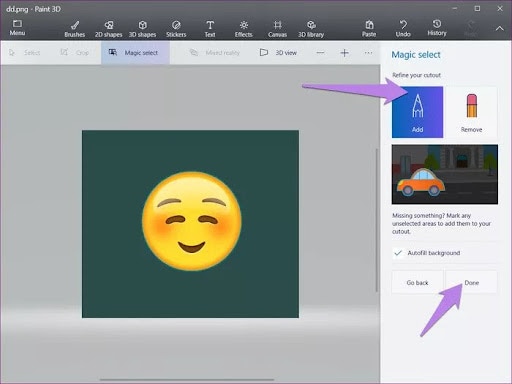
Click on the "Done" push once you are satisfied with the results.
Yous now take your main object equally a carve up element. But, the object withal is on a non-transparent background. There are two ways to brand background transparent in Paint 3D from hither on.
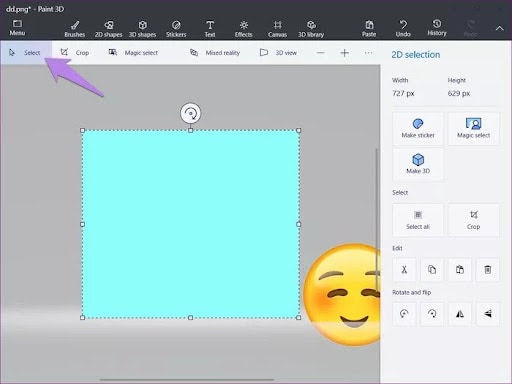
Stride half-dozen:
The first option is to elevate the primary object exterior its background and leave it in that location. Now, click on the "Select" tool from the meridian left menu and select the non-transparent background, and striking the "Delete" key from your keyboard.
Step 7:
The 2d option is to copy the primary object of your prototype and save it every bit a new file. To do this, correct-click on the object and click on the "Copy" option.
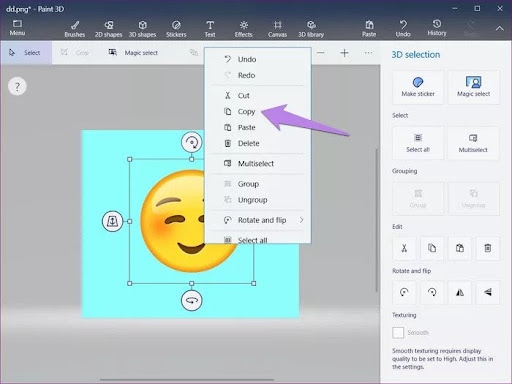
Click on the "Menu" option from the top right corner, followed by the "New" button on the adjacent screen. A white canvas will appear. Right-click on information technology and select the "Paste" option.
magic-select
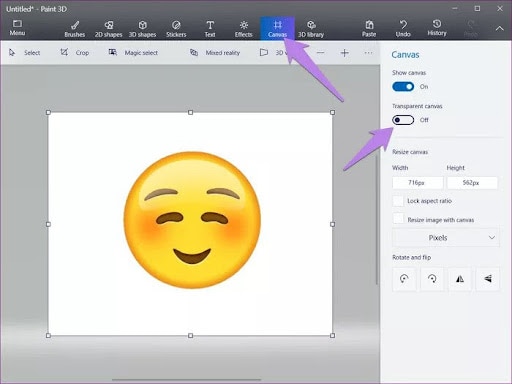
Step 8:
Once you have your principal chemical element on a white canvas, click on the "Sail" option from the top tray of options and toggle on the "Transparent Canvas" option from the right side of your Paint 3D's screen.
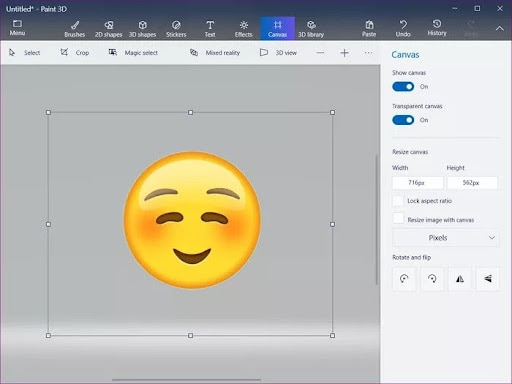
Footstep 9:
This is how to make background transparent in Paint 3D. You can now save the concluding image in PNG format. Using any other format will result in losing the transparent background you worked so hard on.
Office 3 Why not have an alternative of getting a transparent background?
This entire procedure of how to brand background transparent in Pigment 3D is circuitous, especially when you accept easier options out there. 1 of the virtually seamless options out there is PixCut. Let's talk about PixCut and how to employ it to create a transparent background.
WonderShare PixCut is an online photo editing tool, specially created to make background transparent. It is an easy-to-utilize web-based tool that makes it super easy to make background transparent.
Before we get into PixCut features and how to use them to create a transparent background, here are a few reasons why online tools are way meliorate than costly desktop software for basic editing.
- Accessibility: Hands downwardly, online editing tools are the most easily accessible tools. And meliorate besides, if you know which tools to apply. Most entrepreneurs & business owners are new to editing and don't know where to go to do bones editing.
This is the exact reason why I prefer online editing tools and you should too. Anyone - from professionals to beginners tin easily access and use information technology.
- No hefty downloads: Unlike editing software, you lot don't accept to download heavy software to edit your images when you use online editing tools. For example, Adobe Photoshop is too large in size. Likewise, such software also accept processor requirements to part properly.
- The power of AI: Virtually online editing tools like WonderShare PixCut are powered by strong AI. This means that yous have to practice picayune to no manual piece of work while using these tools. You've seen how to make background transparent in Pigment 3D. It is lengthy and circuitous. Soon, I'll testify you how to do the same using PixCut; it literally takes 3 steps.
- Easy for beginners: As far every bit I've seen, most editing software come with a chip of a learning curve. If you aren't a professional, y'all'll take a few days at to the lowest degree to become used to the tool. With online tools, this isn't the case.
- Perfect for basic editing: Online tools are perfect for basic editing. In a manner, that'south what they are created for - easing the painful process of editing/amplifying pictures. Unfortunately, there are many online editing tools out at that place that present the dilemma of "likewise many options."
If you get your easily on a useful online tool like Wondershare PixCut, I recommend bookmarking information technology for future apply.
Hither are the acme features of WonderShare PixCut.
- This tool is powered past stiff AI. So, the user doesn't take to practise whatsoever manual work to create a transparent background in their images.
- You can use it to remove background from images in 3 unproblematic steps. Just upload it, AI will do all the work, and download the final epitome.
- Y'all can utilize PixCut to remove background from images in bulk, which makes it an obvious option every bit compared to Paint 3D.
- PixCut too provides an API which can be integrated with digital platforms - web & mobile apps.
- WonderShare PixCut also offers a bunch of useful features such equally - enlarge images, remove watermarks, etc.
At present that y'all are familiar with the Wondershare PixCut and its features, here'south a uncomplicated step-past-step guide on how to brand groundwork transparent using it.
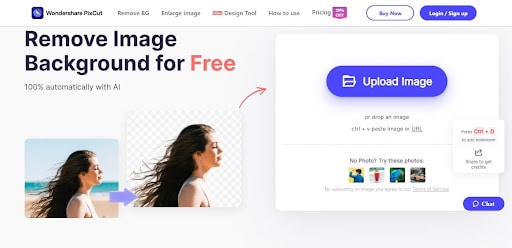
Step ane: Go to PixCut's website. Click on the "Upload Image" button that appears on the head banner. Select the image yo
Footstep 2:
PixCut will automatically find and remove the groundwork of your image. Here is a sample image and how it looks post-editing using this tool.
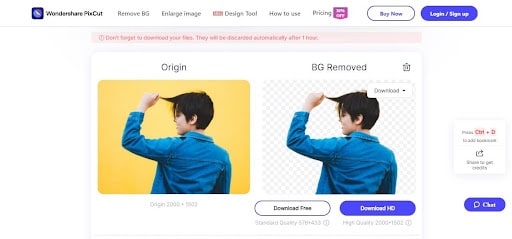
Proceed in mind that NO manual work is required. The smart AI of PixCut works its magic and removes the background from your image automatically.
Pace iii:
This is the last stride. Just hit the "Download Free" button to download the paradigm y'all've edited. PixCut allows yous to freely use it for personal as well as professional utilise.
This is how uncomplicated it is to brand the background of your images transparent using PixCut, a definitive comeback over how to brand background transparent in Paint 3D.
I hope this guide helped y'all to observe the easiest way to create a transparent background. What are y'all waiting for? You know the about astonishing tools to make the background of your images transparent. Get to work now!

How To Add A Background To A Picture With Paint 3d,
Source: https://pixcut.wondershare.com/blog/create-transparent-image-in-paint.html
Posted by: weatherlydepeonew1989.blogspot.com
0 Response to "How To Add A Background To A Picture With Paint 3d"
Post a Comment